Synaptics is a California-based human interface hardware and software developer, including touchpads for laptops, touch, display drivers, and smartphone fingerprint biometrics technology.
Synaptics engineering team used an Atlassian JIRA and Confluence stack in their on-premises datacenter running Tomcat on RedHat Enterprise Linux with Oracle 11g as the backend Database. Maintaining this stack was not meeting Synaptics expected ROI primarily due to the dependency on the Oracle licenses as well as the maintenance of hardware to support the infrastructure.
To evaluate and strategize their IT transformation for these workloads, Synaptics approached Mactores to help and identify the best path forward. Business teams at Synaptics were expecting a 30%-40% reduction in TCO and a 2x increase in performance and scalability. IT teams in Synaptics were tasked with delivering a Zero downtime migration to a managed database on AWS.
The following blog post takes you through the details of the decisions made, and steps are taken to achieve their stated business goals to perform an Oracle migration from on-premises to Amazon Aurora, with zero downtime.
Identifying challenges
Mactores collaborated with the Synaptics IT team to identify existing challenges in their on-premise systems, which were:
-
TCO of operating the Atlassian platforms was high due to Oracle licensing and maintenance of infrastructure.
-
The Atlassian platform was consumed by multiple teams worldwide 24x7 and was highly dependent on them for business operations.
-
The size of the database made migrating to an alternative platform a significant challenge.
Recommended solutions
Mactores recommended migrating the Oracle database to Amazon RDS to achieve a lower TCO for the Atlassian platform. The following were the possible approaches to migrate the Jira and Confluence databases from Oracle to Amazon RDS.
-
Migrating Oracle to MySQL or Postgres on Amazon RDS using Atlassian XML Import Export
-
Migrating Oracle to MySQL or Postgres on Amazon RDS using the Amazon Database Migration Service
Approach 1: Migrating to MySQL or Postgres using Atlassian XML Import Export
Benefits
-
Atlassian supports the method.
-
Only six simple steps are needed, which require limited expertise and supervision throughout the process.
-
Recommended for small-size Atlassian deployments
Challenges
- Database migration to SQL Server fails because of duplicate entries
- Requires 24 hours of downtime
- Atlassian recommends using third-party tools to support massive migrations
Approach 2: Migrating to MySQL or Postgres on Amazon RDS Using the Amazon Database Migration Service (DMS)
Benefits
-
Using the Amazon Schema Conversion Tool (SCT), we can convert the schema into a different database and test the conversion.
-
DMS can handle change data capture
-
Enables zero downtime migration
Challenges
- We need to write additional pre-migration scripts to ensure the schema conversion is performed correctly. Oracle object names are not case sensitive; Postgres object names are.
- We need a tool to verify the successful migration of all the records
Migration Approach and Decisions
Mactores Identified that Postgres had the most compatibility with the existing Oracle SQL and PL/SQL queries and procedures. Thus it was recommended that Synaptics migrate its databases to Amazon RDS Postgres. The following section will focus on addressing these challenges:
Challenges in using DMS to migrate Jira and Confluence from Oracle to Amazon RDS Postgres
The first step in the migration process was to convert the schema from the Oracle database to PostgreSQL.
The Amazon Schema Conversion Tool helps convert your existing database schema from one database engine to another. It provides a project-based user interface to automatically convert the source database schema into a format compatible with the target Amazon RDS instance. If Amazon SCT cannot migrate the schema automatically, Amazon SCT provides guidance on how to create an equivalent schema in your target Amazon RDS database.
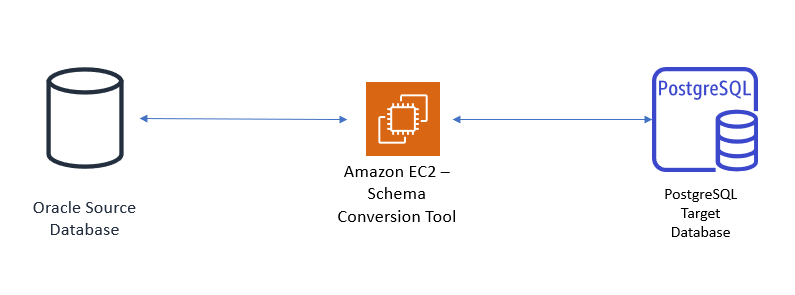
Once the SCT installation is complete, we configured the database connection from on-premises to AWS. The customer used Amazon Direct Connect to connect the on-premises network to Amazon VPC.
Migrating tables
The first step in the migration from the Oracle DB to PostgreSQL is to understand that the Oracle DB is CASE-INSENSITIVE, while PostgreSQL is CASE-SENSITIVE, and for the Confluence and Jira tables, it is essential to preserve case.
For example - In Confluence, a table name that starts with AO_% should have TABLE and COLUMN NAMES in UPPER CASE, while a table that does not have the AO_% prefix should have TABLE and COLUMN NAMES in LOWER CASE. The same condition applies to the Jira tables in the database.
While migrating tables using the Amazon Schema Conversion Tool, we defined Transformation Rules, which satisfy the above conditions.
Migrating Sequences
Migrating sequences includes two essential steps:
- Preserving the sequence CURRENT VALUE from the source database.
- We are adhering to the PostgreSQL naming convention.
We achieved the above steps by executing the sequence scripts using SCT. This step is vital as PostgreSQL requires a strict naming convention, as follows.
Naming convention – TABLENAME_PRIMARYKEY_seq
For example - Source sequence name: AO_563AEE_OBJECT_ENTITY_ID_SEQ should be converted into AO_563AEE_OBJECT_ENTITY_ID_seq for PostgreSQL
Migrating Indexes & Constraints
The migration process of Indexes & Constraints is straight forward. Just right click on Indexes and click on “Convert Schema.”
Data Migration using Amazon DMS
Step 1- Source (Oracle DB) - Creating DMS Users
The first step in the data migration process is to install the DMS agent on the source machine (Creating DMS users). The Oracle database requires the following grants before we proceed with DMS:
GRANT SELECT ANY TRANSACTION to dms_user
GRANT SELECT on V_$ARCHIVED_LOG to dms_user
GRANT SELECT on V_$LOG to dms_user
GRANT SELECT on V_$LOGFILE to dms_user
GRANT SELECT on V_$DATABASE to dms_user
GRANT SELECT on V_$THREAD to dms_user
GRANT SELECT on V_$PARAMETER to dms_user
GRANT SELECT on V_$NLS_PARAMETERS to dms_user
GRANT SELECT on V_$TIMEZONE_NAMES to dms_user
GRANT SELECT on V_$TRANSACTION to dms_user
GRANT SELECT on ALL_INDEXES to dms_user
GRANT SELECT on ALL_OBJECTS to dms_user
GRANT SELECT on DBA_OBJECTS to dms_user (required if the Oracle version is earlier than 11.2.0.3)
GRANT SELECT on ALL_TABLES to dms_user
GRANT SELECT on ALL_USERS to dms_user
GRANT SELECT on ALL_CATALOG to dms_user
GRANT SELECT on ALL_CONSTRAINTS to dms_user
GRANT SELECT on ALL_CONS_COLUMNS to dms_user
GRANT SELECT on ALL_TAB_COLS to dms_user
GRANT SELECT on ALL_IND_COLUMNS to dms_user
GRANT SELECT on ALL_LOG_GROUPS to dms_user
GRANT SELECT on SYS.DBA_REGISTRY to dms_user
GRANT SELECT on SYS.OBJ$ to dms_user
GRANT SELECT on DBA_TABLESPACES to dms_user
GRANT SELECT on ALL_TAB_PARTITIONS to dms_user
GRANT SELECT on ALL_ENCRYPTED_COLUMNS to dms_user
GRANT SELECT on V_$LOGMNR_LOGS to dms_user
GRANT SELECT on V_$LOGMNR_CONTENTS to dms_user
GRANT SELECT on V_$STANDBY_LOG to dms_user
Grant EXECUTE ON dbms_logmnr TO dms_user;
Step 2 - DMS – Creating Replication Instance
To use DMS, you need to create a replication instance. The replication instance performs the data migration operation. When you create an Amazon DMS replication instance, DMS creates the replication instance on an Amazon Elastic Compute Cloud (Amazon EC2) instance in a VPC based on the Amazon Virtual Private Cloud (Amazon VPC) service.
Amazon DMS uses a replication instance to connect to your source data store, read the source data, and format the data for consumption by the target data store. A replication instance also loads the data into the target datastore.
Step 3 - DMS – Creating Source & Target Endpoints
DMS endpoints are used for connecting to databases. An endpoint identifies the datastore type and location information about the database. DMS uses the above information to create connections between the database(s) and the DMS instance. After a successful connection, the migration process can proceed.
The following two endpoints are essential to proceed:
-
Source Endpoint – Oracle:Go to Amazon DMS console and click on Endpoints
-
Select endpoint type as – Source
-
Endpoint Identifier – Name of the endpoint
-
Source Engine – Oracle
-
Server Name – Oracle Server (IP)
-
Port – Enter the port number
-
Enter Username, Password, and Database name
Once all the required parameters are satisfied, click on “Test” to check the connection.
- Target Endpoint – Postgres
- Select endpoint type as – Target
- Endpoint Identifier – Name of the endpoint
- Source Engine – checkbox RDS and select the required instance
- Server Name – RDS Server Name (auto-filled)
- Port – Enter the Port number (auto-filled)
- Enter Username, Password, and Database name
Once all the required parameters are satisfied, click on “Test” to check the connection.
Step 4 - DMS – Creation, and Configuration of Task
The DMS task is where the actual migration begins. You can configure which schemas, tables, and columns to include and exclude. You can also define a transformation process like converting tables or schema names, converting case (lower/upper), and many other required transformations.
Step 5 – Oracle – Enabling supplemental logging for change data capture
To continuously capture the changes in an Oracle system, Supplemental Logging is required. We used the following commands on the Oracle source system to enable this to support DMS change data capture.
-
Run the following command to enable supplemental logging at the database level:ALTER DATABASE ADD SUPPLEMENTAL LOG DATA;ALTER DATABASE ADD SUPPLEMENTAL LOG DATA (PRIMARY KEY) COLUMNS;
-
Enable supplemental on Table levelALTER TABLE table_name ADD SUPPLEMENTAL LOG DATA (PRIMARY KEY) COLUMNS;
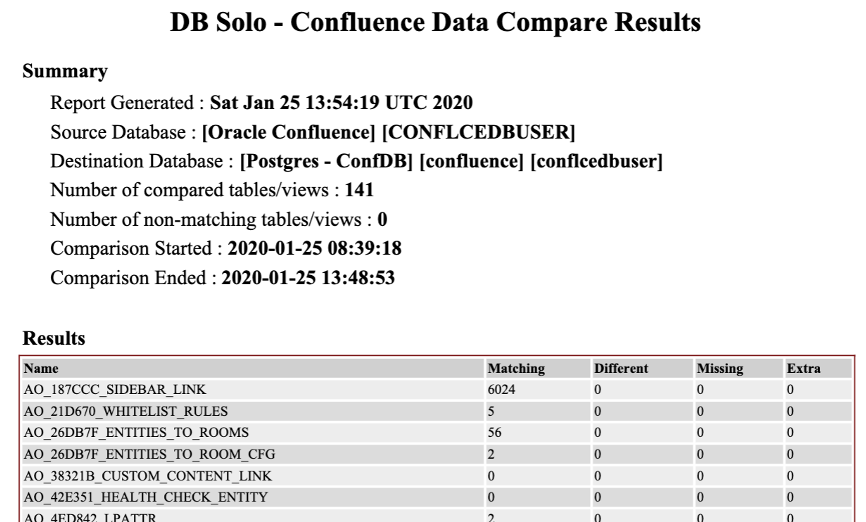
Step 6 - Data Validation – DB Solo
Once all the data migration is complete, it is essential to validate the data, and we recommend using “DB Solo.” DB Solo is a tool that helps to identify the differences between rows, tables, and views between source and destination to validate data migration.
Migration Architecture Diagram

Note: CloudEndure was used to migrate applications and file servers. CloudEndure migration continually replicates on-premise source machines into a staging area in your AWS account without causing downtime or impacting performance. When you’re ready to launch the production machines, CloudEndure Migration automatically converts your machines from their source infrastructure into the AWS infrastructure so they can boot and run natively in AWS.
To learn more, you can refer to this URL: How to configure CloudEndure to migrate servers.
Go Live & Conclusion
Once the configuration for Amazon DMS & CloudEndure was successful, we enabled Change Data Capture on the Database and file system. During cutover, the following steps were executed:
- Point DNS to new URL
- Change connection string on application (Jira & Confluence)
- Decommission on-premises infrastructure
- Applied AWS 101 - Monitoring Best Practices
This migration achieved all the goals that were part of the migration process. The processed described in this blog post were deployed on the non-production environment before implementing them on production environment.
We completed this migration with near-zero downtime without having to upgrade to latest version of Jira and Confluence. We achieved about 70% ROI on AWS as compared to on-premises deployment.